Saturday, 28 July 2012

Quick preference tutorial

                        Quick preference  tutorial


QuickpreferenceActivity .java


package a.b;

import android.content.Intent;
import android.os.Bundle;
import android.preference.PreferenceActivity;
import android.view.Menu;
import android.view.MenuItem;

public class QuickpreferenceActivity extends PreferenceActivity {
    
    @Override
    public void onCreate(Bundle savedInstanceState) {        
        super.onCreate(savedInstanceState);        
        addPreferencesFromResource(R.xml.preff);        
    }
    
    @Override
    public boolean onCreateOptionsMenu(Menu menu) {
        menu.add(Menu.NONE, 0, 0, "Show current settings");
        return super.onCreateOptionsMenu(menu);
    }

    @Override
    public boolean onOptionsItemSelected(MenuItem item) {
        switch (item.getItemId()) {
            case 0:
                startActivity(new Intent(this, ShowSettingsActivity.class));
                return true;
        }
        return false;
    }
    
}

ShowSettingsActivity 


package a.b;


import android.app.Activity;
import android.content.SharedPreferences;
import android.os.Bundle;
import android.preference.PreferenceManager;
import android.widget.TextView;

public class ShowSettingsActivity extends Activity {

 @Override
 protected void onCreate(Bundle savedInstanceState) {

  super.onCreate(savedInstanceState);
  setContentView(R.layout.main);

  SharedPreferences sharedPrefs = PreferenceManager.getDefaultSharedPreferences(this);

  StringBuilder builder = new StringBuilder();

  builder.append("\n" + sharedPrefs.getBoolean("perform_updates", false));
  builder.append("\n" + sharedPrefs.getString("updates_interval", "-1"));
  builder.append("\n" + sharedPrefs.getString("welcome_message", "NULL"));

  TextView settingsTextView = (TextView) findViewById(R.id.settings_text_view);
  settingsTextView.setText(builder.toString());

 }

}


main.xml


<?xml version="1.0" encoding="utf-8"?>

<LinearLayout 
    xmlns:android="http://schemas.android.com/apk/res/android"
    android:orientation="vertical"
    android:layout_width="fill_parent"
    android:layout_height="fill_parent"
    >
    
    <TextView
        android:id="@+id/settings_text_view"
        android:layout_width="fill_parent" 
        android:layout_height="wrap_content"
    />
    
</LinearLayout>


pref.xml


<?xml version="1.0" encoding="utf-8"?>

<PreferenceScreen xmlns:android="http://schemas.android.com/apk/res/android">

    <PreferenceCategory 
        android:title="First Category"
        android:key="first_category">
        
        <CheckBoxPreference 
            android:key="perform_updates"
            android:summary="Enable or disable data updates"
            android:title="Enable updates" 
            android:defaultValue="true"
        />
        
        <ListPreference 
            android:key="updates_interval"
            android:title="Updates interval"
            android:summary="Define how often updates will be performed"
            android:defaultValue="1000" 
            android:entries="@array/updateInterval"
            android:entryValues="@array/updateIntervalValues"
            android:dependency="perform_updates"
        />    
            
    </PreferenceCategory>

    <PreferenceCategory 
        android:title="Second Category"
        android:key="second_category">

        <EditTextPreference
            android:key="welcome_message"
            android:title="Welcome Message" 
            android:summary="Define the Welcome message to be shown"
            android:dialogTitle="Welcome Message"
            android:dialogMessage="Provide a message"    
            android:defaultValue="Default welcome message" />

    </PreferenceCategory>
    
</PreferenceScreen>


Thursday, 26 July 2012

SQLite a complete example - create db,table,insert values,update,delete,drop

   SQLite a complete example - create db,table,insert values,update,delete,drop


package a.b;

import java.util.ArrayList;

import android.app.Activity;
import android.app.ListActivity;
import android.content.ContentValues;
import android.content.Context;
import android.database.Cursor;
import android.database.sqlite.SQLiteDatabase;
import android.database.sqlite.SQLiteException;
import android.os.Bundle;
import android.widget.ArrayAdapter;
import android.widget.TextView;
import android.widget.Toast;

public class Sqldemo1Activity extends ListActivity {
SQLiteDatabase db;
private static String DBNAME = "jithunew.db";    
   private static String TABLE = "jithu12345";      
 
ArrayList results = new ArrayList();
    @Override
    public void onCreate(Bundle savedInstanceState)
    {
        super.onCreate(savedInstanceState);

       
        try
        {
        createdb();
        insertvalues();
        showlist();
        updatedb();
        deletevalue();
           droptable();
        db.close();
        }
        catch(Exception e)
        {
       
        }
    }


              private void deletevalue() {
             
             try{
                    
                      db.execSQL("DELETE FROM " + TABLE + " WHERE name = 'BBB'");
                      
                  }catch(Exception e){
                      Toast.makeText(getApplicationContext(), "Error encountered while deleting.", Toast.LENGTH_LONG);
                  }
}

private void droptable() {
               
               try{
                    
                      db.execSQL("DROP TABLE " + TABLE );
                      
                  }catch(Exception e){
                      Toast.makeText(getApplicationContext(), "Error encountered while deleting.", Toast.LENGTH_LONG);
                  }
}

private void updatedb() {
             
             
             try{
                   
                      db.execSQL("UPDATE " + TABLE + " SET name = 'jithu' WHERE phone = '555'");
                    
                  }catch(Exception e){
                      Toast.makeText(getApplicationContext(), "Error encountered", Toast.LENGTH_LONG);
                  }
}


private void showlist() {
// TODO Auto-generated method stub
             
             Cursor cursor = db.query("jithu12345", null, null, null, null, null,
             null);
            int count = 0;
            for (cursor.moveToFirst(); !cursor.isAfterLast(); cursor.moveToNext()) {
            count++;
            //fetching from database and adding to arrayList
             
             
            results.add(count+" :"+cursor.getString(cursor.getColumnIndex("name"))
              +" "+cursor.getString(cursor.getColumnIndex("name"))
              +" ("+cursor.getInt(cursor.getColumnIndex("phone"))+")");
            }

            //display in screen
            this.setListAdapter(new ArrayAdapter(this,
             android.R.layout.simple_list_item_1, results));

           
}


private void createdb()
                {
           try
                 {
                  db= SQLiteDatabase.openDatabase("/data/data/a.b/jithunew",null,SQLiteDatabase.CREATE_IF_NECESSARY);
           
                 }
                catch(SQLiteException e) 
                 {
                   Toast.makeText(this, e.getMessage(), 1).show();
                    }
                     }


            private void insertvalues()
              {
           try
            {
      
     
      db.execSQL("create table jithu12345("
      + " recID integer PRIMARY KEY autoincrement, "
      + " name text, "
      + " phone text ); ");
     
     
      Toast.makeText(this, "Table was created",1).show();
      
            }
            catch(SQLiteException e1)
            {
            Toast.makeText(this, e1.getMessage(),1).show();
            }


      try{
   
    db.execSQL( "insert into jithu12345(name, phone) "+ " values ('AAA', '555' );");
    db.execSQL("insert into  jithu12345(name, phone) " + " values ('BBB', '777' );");
    db.execSQL("insert into  jithu12345(name, phone) " + " values ('CCC', '999' );");
     
    db.execSQL( "insert into  jithu12345(name, phone) " + " values ('AAAaaaaa', '55523545' );");
        db.execSQL("insert into  jithu12345(name, phone) " + " values ('BBBbbbb', '777345345' );");
        db.execSQL("insert into  jithu12345(name, phone) "+ " values ('CCCcccc', '999345345' );");


    Toast.makeText(this, "  records were inserted",1).show();
    }
    catch(SQLiteException e2) {
   
    Toast.makeText(this, e2.getMessage(),1).show();
    }
       }
            
            
                            }

Download Android Codes From SkyBlueAndroid

Wednesday, 25 July 2012

Create SQLite database and show it on a ListView using cursor in Android.

             Create SQLite database and show it on a ListView using cursor in Android.

In previous post we study how to create SQLite data base , and tables,insert values to the table.here we are showing the database details on a ListView.complete source code is given below


Sqldemo1Activity .java


package a.b;

import java.util.ArrayList;

import android.app.Activity;
import android.app.ListActivity;
import android.content.ContentValues;
import android.database.Cursor;
import android.database.sqlite.SQLiteDatabase;
import android.database.sqlite.SQLiteException;
import android.os.Bundle;
import android.widget.ArrayAdapter;
import android.widget.TextView;
import android.widget.Toast;

public class Sqldemo1Activity extends ListActivity {
SQLiteDatabase db;
TextView txtMsg;
ArrayList results = new ArrayList();
    @Override
    public void onCreate(Bundle savedInstanceState)
    {
        super.onCreate(savedInstanceState);

        txtMsg= (TextView) findViewById(R.id.txtMsg);
        try
        {
        createdb();
        insertvalues();
        showlist();
        
        db.close();
        }
        catch(Exception e)
        {
       
        }
    }


              private void showlist() {
// TODO Auto-generated method stub
             
             Cursor cursor = db.query("jithu12345", null, null, null, null, null,
             null);
            int count = 0;
            for (cursor.moveToFirst(); !cursor.isAfterLast(); cursor.moveToNext()) {
            count++;
            //fetching from database and adding to arrayList
             
             
            results.add(count+" :"+cursor.getString(cursor.getColumnIndex("name"))
              +" "+cursor.getString(cursor.getColumnIndex("name"))
              +" ("+cursor.getInt(cursor.getColumnIndex("phone"))+")");
            }

            //display in screen
            this.setListAdapter(new ArrayAdapter(this,
             android.R.layout.simple_list_item_1, results));

           
}


private void createdb()
                {
           try
                 {
                  db= SQLiteDatabase.openDatabase("/data/data/a.b/jithunew",null,SQLiteDatabase.CREATE_IF_NECESSARY);
           
                 }
                catch(SQLiteException e) 
                 {
                   Toast.makeText(this, e.getMessage(), 1).show();
                    }
                     }


            private void insertvalues()
              {
           try
            {
      
     
      db.execSQL("create table jithu12345("
      + " recID integer PRIMARY KEY autoincrement, "
      + " name text, "
      + " phone text ); ");
     
     
      Toast.makeText(this, "Table was created",1).show();
      
            }
            catch(SQLiteException e1)
            {
            Toast.makeText(this, e1.getMessage(),1).show();
            }


      try{
   
    db.execSQL( "insert into jithu12345(name, phone) "+ " values ('AAA', '555' );");
    db.execSQL("insert into  jithu12345(name, phone) " + " values ('BBB', '777' );");
    db.execSQL("insert into  jithu12345(name, phone) " + " values ('CCC', '999' );");
     
    db.execSQL( "insert into  jithu12345(name, phone) " + " values ('AAAaaaaa', '55523545' );");
        db.execSQL("insert into  jithu12345(name, phone) " + " values ('BBBbbbb', '777345345' );");
        db.execSQL("insert into  jithu12345(name, phone) "+ " values ('CCCcccc', '999345345' );");


    Toast.makeText(this, "  records were inserted",1).show();
    }
    catch(SQLiteException e2) {
   
    Toast.makeText(this, e2.getMessage(),1).show();
    }
       }
            
            
                            }


Google map using Intent

    Google map using Intent


MapusingintentActivity.java


  package a.b;

import com.google.android.maps.MapActivity;

import android.app.Activity;
import android.content.Intent;
import android.net.Uri;
import android.os.Bundle;

public class MapusingintentActivity extends MapActivity {

Uri uri;
    /** Called when the activity is first created. */
    @Override
    public void onCreate(Bundle savedInstanceState) {
        super.onCreate(savedInstanceState);
        setContentView(R.layout.main);
        double latitude = 10.530325;
        double longitude = 76.221353;
        uri = Uri.parse("geo:" + latitude  + "," + longitude +"?z=10");
        Intent intent = new Intent(Intent.ACTION_VIEW, uri);
        startActivity(intent);
    }
@Override
protected boolean isRouteDisplayed() {
// TODO Auto-generated method stub
return false;
}
   
   
}


Draw route in Google map for source and destination points


                    Draw route in Google map  for source and destination points


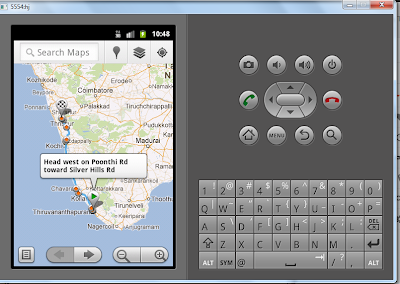
Here is an example for draw the route for the two points and it also provide the direction.example code is      given below

Rootmapdemo1Activity.java


package a.b;

import android.content.Intent;
import android.net.Uri;
import android.os.Bundle;

import com.google.android.maps.MapActivity;

public class Rootmapdemo1Activity extends MapActivity {

 Uri uri;

 @Override
 public void onCreate(Bundle savedInstanceState) {
  super.onCreate(savedInstanceState);
                 uri =Uri.parse("http://maps.google.com/maps?&saddr=8.516017,76.919784&daddr=10.530325, 76.221353");
                 Intent intent = new Intent(Intent.ACTION_VIEW, uri);
                 startActivity(intent);
                 finish();
 }

 @Override
 protected boolean isRouteDisplayed() {
  return false;
 }
}


main.xml


<?xml version="1.0" encoding="utf-8"?>
<RelativeLayout xmlns:android="http://schemas.android.com/apk/res/android" 
    android:layout_width="fill_parent" 
    android:layout_height="fill_parent">
 
    <com.google.android.maps.MapView 
        android:id="@+id/mapView"
        android:layout_width="fill_parent"
        android:layout_height="fill_parent"
        android:enabled="true"
        android:clickable="true"
        android:apiKey="0vNjDM-9Hpz9W0naxngZObrxztXkFRH5LfyxboA"
        />
 
</RelativeLayout>


Download Android Codes From SkyBlueAndroid

Monday, 23 July 2012

Google Map in android a simple example

   Google Map in android  a simple example


 main.xml


<?xml version="1.0" encoding="utf-8"?>
<RelativeLayout xmlns:android="http://schemas.android.com/apk/res/android"
    android:layout_width="fill_parent"
    android:layout_height="fill_parent">

    <com.google.android.maps.MapView
        android:id="@+id/mapView"
        android:layout_width="fill_parent"
        android:layout_height="fill_parent"
        android:enabled="true"
        android:clickable="true"
        android:apiKey="0vNjDM-9Hpz9W0naxngZObrxztXkFRH5LfyxboA"
        />

</RelativeLayout>

 Newmap1Activity.java


package a.b;

import com.google.android.maps.MapActivity;

import android.app.Activity;
import android.os.Bundle;

public class Newmap1Activity extends MapActivity {
    /** Called when the activity is first created. */
    @Override
    public void onCreate(Bundle savedInstanceState) {
        super.onCreate(savedInstanceState);
        setContentView(R.layout.main);
    }

@Override
protected boolean isRouteDisplayed() {
// TODO Auto-generated method stub
return false;
}
}


set the  internet permission and the library.


How to generate map key for android

               How to generate map key for android


Following are the steps to generate the Google map key for the android. 


  1. select the java path in your system
            C:\Program Files\Java\jdk1.6.0_24\bin>


    2   Then  find the keystore file in .android folder

          C:\Users\WOT.WOT-PC\.android

        then   copy the code which is given below in your cmd

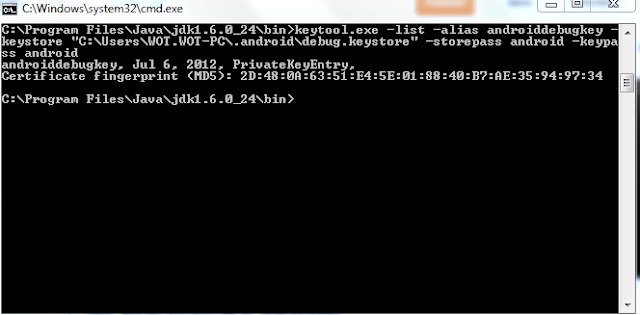
  keytool.exe -list -alias androiddebugkey -keystore "C:\Users\WOT.WOT-PC\.android\debug.keystore" -storepass android -keypass android


here we get the MD5 and put this MD5 in the following link  which is for generate the map  Key


Then we get the page like this and enter your MD5 here and click on generate map key


 then finally you got your map key which given here


SQLite Tutorial

     SQLite Tutorial

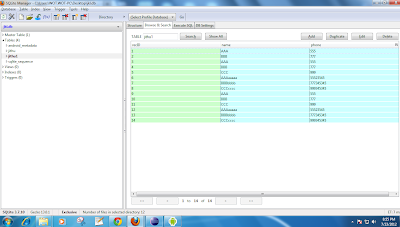
  SQLite is used to store data in android.using SQLite manager which is available as a extension  in Mozilla we can illustrate the SQLite example


create a database Using SQLite in android 


db=SQLiteDatabase.openDatabase("/data/data/a.b/jithunew",null,SQLiteDatabase.CREATE_IF_NECESSARY);
db.close();


create a table Using SQLite in android


 db.execSQL("create table jithu1("
      + " recID integer PRIMARY KEY autoincrement, "
      + " name text, "
      + " phone text ); ");


Entering fields in to the table


                  db.execSQL( "insert into jithu1(name, phone) "+ " values ('AAA', '555' );");
      db.execSQL("insert into  jithu1(name, phone) " + " values ('BBB', '777' );");
      db.execSQL("insert into  jithu1(name, phone) " + " values ('CCC', '999' );");
   
    db.execSQL( "insert into  jithu1(name, phone) " + " values ('AAAaaaaa', '55523545' );");
             db.execSQL("insert into  jithu1(name, phone) " + " values ('BBBbbbb', '777345345' );");
             db.execSQL("insert into  jithu1(name, phone) "+ " values ('CCCcccc', '999345345' );");

following is a complete example for to create database,table and insert values to the table

Sqldemo1Activity.java


  package a.b;

import android.app.Activity;

import android.content.ContentValues;

import android.database.Cursor;

import android.database.sqlite.SQLiteDatabase;

import android.database.sqlite.SQLiteException;

import android.os.Bundle;

import android.widget.TextView;

import android.widget.Toast;


public class Sqldemo1Activity extends Activity {

SQLiteDatabase db;

TextView txtMsg;

    @Override

    public void onCreate(Bundle savedInstanceState)

    {

        super.onCreate(savedInstanceState);

        setContentView(R.layout.main);

        txtMsg= (TextView) findViewById(R.id.txtMsg);

        try

        {

        createdb();

        insertvalues();

         db.close();

        }

        catch(Exception e)

        {


        }

    }

              private void createdb()

                {

           try

                 {

                  db= SQLiteDatabase.openDatabase("/data/data/a.b/jithunew",null,SQLiteDatabase.CREATE_IF_NECESSARY);

                 }

                catch(SQLiteException e) 

                 {

                   Toast.makeText(this, e.getMessage(), 1).show();

                    }

                     }

                          private void insertvalues()

              {

           try

            {

           db.execSQL("create table jithu1("

      + " recID integer PRIMARY KEY autoincrement, "

      + " name text, "

      + " phone text ); ");

          Toast.makeText(this, "Table was created",1).show();

                 }

            catch(SQLiteException e1)

            {

            Toast.makeText(this, e1.getMessage(),1).show();

            }


      try{

        db.execSQL( "insert into jithu1(name, phone) "+ " values ('AAA', '555' );");

    db.execSQL("insert into  jithu1(name, phone) " + " values ('BBB', '777' );");

    db.execSQL("insert into  jithu1(name, phone) " + " values ('CCC', '999' );");


    db.execSQL( "insert into  jithu1(name, phone) " + " values ('AAAaaaaa', '55523545' );");

        db.execSQL("insert into  jithu1(name, phone) " + " values ('BBBbbbb', '777345345' );");

        db.execSQL("insert into  jithu1(name, phone) "+ " values ('CCCcccc', '999345345' );");

            String[] parms=new String[] {"snicklefritz"};

        ContentValues replacements = null;

db.update("jithu1", replacements, "name=?", parms);

        Toast.makeText(this, "  records were inserted",1).show();

    }

    catch(SQLiteException e2) {


    Toast.makeText(this, e2.getMessage(),1).show();

    }

       }

    }


then from the  file explorer select the file and click on pull a file from the device .


save the file in to databasename.db and connect this data base with help of SQLite manager.which is given below 


Monday, 16 July 2012

OPTIONS MENU IN ANDROID EXAMPLE


   OPTIONS MENU IN ANDROID EXAMPLE


In Android there are mainly 3 types of menus are acaiable


  •    options menu
  •    context menu
  •    popup menu
          following is the example for the options menu.in this first we want to create a menu folder in the res and inside the menu create a xml file


menuj.xml  


<?xml version="1.0" encoding="utf-8"?>
<menu
  xmlns:android="http://schemas.android.com/apk/res/android">
    <item 
    android:id="@+id/item1"
     android:title="add" 
     android:icon="@drawable/bb"  >
     </item>
    <item 
    android:id="@+id/item2" 
    android:title="delete" 
    android:icon="@drawable/cc">
    </item>
    <item 
    android:id="@+id/item3" 
    android:title="exit" 
    android:icon="@drawable/aa">
    </item>
    
</menu>


OptionalmenuActivity.java


package a.b;

import android.app.Activity;
import android.content.Intent;
import android.os.Bundle;
import android.view.Menu;
import android.view.MenuInflater;
import android.view.MenuItem;
import android.widget.Toast;

public class OptionalmenuActivity extends Activity {
    /** Called when the activity is first created. */
    @Override
    public void onCreate(Bundle savedInstanceState) {
        super.onCreate(savedInstanceState);
        setContentView(R.layout.main);
    }
    @Override
    public boolean onCreateOptionsMenu(Menu menu) {
        MenuInflater inflater = getMenuInflater();
        inflater.inflate(R.menu.menuj, menu);
        return true;
    }
    @Override
    public boolean onOptionsItemSelected(MenuItem item) {
        // Handle item selection
        switch (item.getItemId()) {
            case R.id.item1:
                add();
                return true;
            case R.id.item2:
                delete();
                return true;
            case R.id.item3:
                exit();
                return true;
            default:
                return super.onOptionsItemSelected(item);
        }
    }
private void exit() {
// TODO Auto-generated method stub
Toast.makeText(this, "jithu exit demo", Toast.LENGTH_SHORT).show();
}
private void add() {
Intent i=new Intent(this,abc.class);
startActivity(i);
// TODO Auto-generated method stub\
Toast.makeText(this, "function 2 called", Toast.LENGTH_SHORT).show();
}
private void delete() {
// TODO Auto-generated method stub
Toast.makeText(this, "jithu", Toast.LENGTH_SHORT).show();
}
}

then the menu is created.then write the xml file


main.xml


<?xml version="1.0" encoding="utf-8"?>
<LinearLayout xmlns:android="http://schemas.android.com/apk/res/android"
    android:orientation="vertical"
    android:layout_width="fill_parent"
    android:layout_height="fill_parent"
    >
<TextView  
    android:layout_width="fill_parent" 
    android:layout_height="wrap_content" 
    android:text="@string/hello"
    />
</LinearLayout>


main1.xml


<?xml version="1.0" encoding="utf-8"?>
<LinearLayout
  xmlns:android="http://schemas.android.com/apk/res/android"
  android:orientation="vertical"
  android:layout_width="match_parent"
  android:layout_height="match_parent">
    <Button 
    android:text="Button" 
    android:id="@+id/button1" 
    android:layout_width="wrap_content" 
    android:layout_height="wrap_content">
    </Button>
    <Button 
    android:text="Button" 
    android:id="@+id/button2" 
    android:layout_width="wrap_content" 
    android:layout_height="wrap_content"></Button>
    <Button 
    android:text="Button" 
    android:id="@+id/button3" 
    android:layout_width="wrap_content" 
    android:layout_height="wrap_content">
    </Button>
    
</LinearLayout>


Sunday, 15 July 2012

Moving from one activity to another in android


     Moving from one activity to another in android 


Intents are used to move one activity to another in android.following are the some of the methods to invoke the intents.

  1. startActivity(intent)
  2. sendBroadcast(intent)
  3. startService(intent)
  4. bindService(intent)
  in the startActivity of intent is used to start the another activity and the next one sendBroadcast(intent) is for sending to any broadcast receiver and the other two is used for interact with the background service.  

the basic syntax for the intent is given below


Intent i=new Intent(this,abc.class);
startActivity(i);


following is a simple program for intent


 Intentdemo1.java


import android.app.Activity;

import android.content.Intent;

import android.os.Bundle;

import android.view.View;

import android.widget.Button;

import android.widget.EditText;

import android.widget.Toast;


public class Intentdemo1Activity extends Activity

{

  Button b1;

 EditText e1;

      @Override

    public void onCreate(Bundle savedInstanceState) 

{

        super.onCreate(savedInstanceState);

        setContentView(R.layout.main);

           b1=(Button)findViewById(R.id.button1);

    }

    public void sendmsg(View v)

    {

    if (v==b1)

    {

    EditText e1=(EditText)findViewById(R.id.edit1);

    Intent i=new Intent(this,intentdemo2.class);

    startActivity(i);

         Toast.makeText(this, "haiiiiii",Toast.LENGTH_LONG).show();

    }

    }

    }


intentdemo2.java


package a.b;

import android.app.Activity;

import android.content.Intent;

import android.os.Bundle;

import android.widget.Button;

import android.widget.TextView;


public class msgclass extends Activity {

    @Override

    public void onCreate(Bundle savedInstanceState) {

        super.onCreate(savedInstanceState);

     setContentview(R.layout.main);

           }

}


pass a message from one activity to another in android


                   pass a message from one activity  to another


Here is a simple program for intent to pass a message from one activity  to another.


ButtonclickActivity.java

package a.b;


import android.app.Activity;

import android.content.Intent;

import android.os.Bundle;

import android.view.View;

import android.widget.Button;

import android.widget.EditText;

import android.widget.Toast;


public class ButtonclickActivity extends Activity {

 public final static String EXTRA_MESSAGE=null;

  Button b1;

  EditText e1;

    /** Called when the activity is first created. */

    @Override

    public void onCreate(Bundle savedInstanceState) {

        super.onCreate(savedInstanceState);

        setContentView(R.layout.main);


        b1=(Button)findViewById(R.id.button1);


    }

    public void sendmsg(View v)

    {

     if (v==b1)

     {

     EditText e1=(EditText)findViewById(R.id.edit1);

     Intent i=new Intent(this,msgclass.class);

     //startActivity(i);

     String msg=e1.getText().toString();

     i.putExtra(EXTRA_MESSAGE, msg);

     startActivity(i);

     Toast.makeText(this, "haiiiiii",Toast.LENGTH_LONG).show();

     }

    }


} 


 msgclass.java


package a.b;


import android.app.Activity;

import android.content.Intent;

import android.os.Bundle;

import android.widget.Button;

import android.widget.TextView;


public class msgclass extends Activity {

    @Override

    public void onCreate(Bundle savedInstanceState) {

        super.onCreate(savedInstanceState);


        Intent i = getIntent();

        String msg = i.getStringExtra(ButtonclickActivity.EXTRA_MESSAGE);


        TextView textView = new TextView(this);

        textView.setTextSize(40);

        textView.setText(msg);

        setContentView(textView);


           }

}

 main.xml


<?xml version="1.0" encoding="utf-8"?>
<LinearLayout xmlns:android="http://schemas.android.com/apk/res/android"
    android:orientation="vertical"
    android:layout_width="fill_parent"
    android:layout_height="fill_parent"
    >
<TextView  
    android:layout_width="fill_parent" 
    android:layout_height="wrap_content" 
    android:text="@string/hello"
    />
    <EditText 
    android:id="@+id/edit1"
    android:layout_width="wrap_content"
    android:layout_height="wrap_content"
    android:hint="enter your messagge here.................."
    android:layout_marginTop="50dip"/>
    <Button android:layout_height="62dip"
     android:id="@+id/button1" 
     android:layout_marginLeft="75dip" 
     android:layout_marginTop="75dip" 
     android:text="enter" 
     android:onClick="sendmsg" 
     android:layout_width="62dip">
     </Button>
</LinearLayout>