SQLite Tutorial
SQLite is used to store data in android.using SQLite manager which is available as a extension in Mozilla we can illustrate the SQLite examplecreate a database Using SQLite in android
db=SQLiteDatabase.openDatabase("/data/data/a.b/jithunew",null,SQLiteDatabase.CREATE_IF_NECESSARY);
db.close();
create a table Using SQLite in android
db.execSQL("create table jithu1("
+ " recID integer PRIMARY KEY autoincrement, "
+ " name text, "
+ " phone text ); ");
Entering fields in to the table
db.execSQL( "insert into jithu1(name, phone) "+ " values ('AAA', '555' );");
db.execSQL("insert into jithu1(name, phone) " + " values ('BBB', '777' );");
db.execSQL("insert into jithu1(name, phone) " + " values ('CCC', '999' );");
db.execSQL( "insert into jithu1(name, phone) " + " values ('AAAaaaaa', '55523545' );");
db.execSQL("insert into jithu1(name, phone) " + " values ('BBBbbbb', '777345345' );");
db.execSQL("insert into jithu1(name, phone) "+ " values ('CCCcccc', '999345345' );");
following is a complete example for to create database,table and insert values to the table
Sqldemo1Activity.java
package a.b;
import android.app.Activity;
import android.content.ContentValues;
import android.database.Cursor;
import android.database.sqlite.SQLiteDatabase;
import android.database.sqlite.SQLiteException;
import android.os.Bundle;
import android.widget.TextView;
import android.widget.Toast;
public class Sqldemo1Activity extends Activity {
SQLiteDatabase db;
TextView txtMsg;
@Override
public void onCreate(Bundle savedInstanceState)
{
super.onCreate(savedInstanceState);
setContentView(R.layout.main);
txtMsg= (TextView) findViewById(R.id.txtMsg);
try
{
createdb();
insertvalues();
db.close();
}
catch(Exception e)
{
}
}
private void createdb()
{
try
{
db= SQLiteDatabase.openDatabase("/data/data/a.b/jithunew",null,SQLiteDatabase.CREATE_IF_NECESSARY);
}
catch(SQLiteException e)
{
Toast.makeText(this, e.getMessage(), 1).show();
}
}
private void insertvalues()
{
try
{
db.execSQL("create table jithu1("
+ " recID integer PRIMARY KEY autoincrement, "
+ " name text, "
+ " phone text ); ");
Toast.makeText(this, "Table was created",1).show();
}
catch(SQLiteException e1)
{
Toast.makeText(this, e1.getMessage(),1).show();
}
try{
db.execSQL( "insert into jithu1(name, phone) "+ " values ('AAA', '555' );");
db.execSQL("insert into jithu1(name, phone) " + " values ('BBB', '777' );");
db.execSQL("insert into jithu1(name, phone) " + " values ('CCC', '999' );");
db.execSQL( "insert into jithu1(name, phone) " + " values ('AAAaaaaa', '55523545' );");
db.execSQL("insert into jithu1(name, phone) " + " values ('BBBbbbb', '777345345' );");
db.execSQL("insert into jithu1(name, phone) "+ " values ('CCCcccc', '999345345' );");
String[] parms=new String[] {"snicklefritz"};
ContentValues replacements = null;
db.update("jithu1", replacements, "name=?", parms);
Toast.makeText(this, " records were inserted",1).show();
}
catch(SQLiteException e2) {
Toast.makeText(this, e2.getMessage(),1).show();
}
}
}
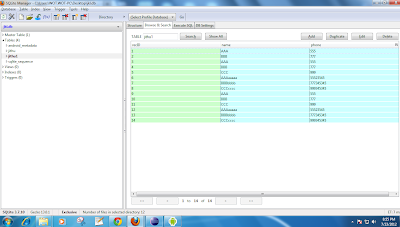
then from the file explorer select the file and click on pull a file from the device .
save the file in to databasename.db and connect this data base with help of SQLite manager.which is given below


No comments:
Post a Comment